Monday, December 30, 2019
Thursday, December 19, 2019
AIRCRAFT ARDUPILOT TRIM
It is better to rim the aircraft equipped with ardupilot using mission planner.
FULL PARAMETER LIST
SERVO1_TRIM = AILERON TRIM
SERVO2_TRIM = ELEVATOR TRIM
SERVO4_TRIM = RUDDER TRIM
FULL PARAMETER LIST
SERVO1_TRIM = AILERON TRIM
SERVO2_TRIM = ELEVATOR TRIM
SERVO4_TRIM = RUDDER TRIM
USM VTOL
20-12-2019
Q_RTL_MODE = Set to 1 (Enable VTOL)
WP_LOITER_RAD = 80 meters
Q_VFWD_GAIN = 0.025 = Change from 0 to 0.025 (referring to nimbus)(Forward motor will turn on during Qloiter positioning control)
Q_WVANE_GAIN = 0.1
Q_WVANE_MINROLL = 3 = Change from 1 to 3 (Minimum Roll in degrees before active weathervaning will start)
ALT_HOLD_RTL = 5000 cm (50 meters) = Changes from 100 meters to 50 meters. (referring to nimbus)
Q_RTL_MODE = 1 = VTOL RTL Enable
Q_LAND_FINAL_ALT = 8 = Change from 6 to 8 meters (referring to nimbus)
Q_LAND_SPEED = 50 cm/s
WP_RADIUS = 15 meters = Change from 2 meter to 15 meters
Tuesday, December 17, 2019
Sunday, December 15, 2019
Monday, November 4, 2019
pixhawk output (Servo)

***************************************
Manual Control Mode
***************************************
***************************************
If you are using FSi6, use steps below.
1. Set Ch6 as SWD.
2. In mission planner, set RC6_function as Landing Gear.
3. Set Servo9_function as Landing Gear.
4. Connect servo to Aux1.
5. Reboot pixhawk.
6. Servo will move if button is clicked.
*********************************************
Automatic Control Mode (Without Remote Controller switch) 16.5.2024
*********************************************
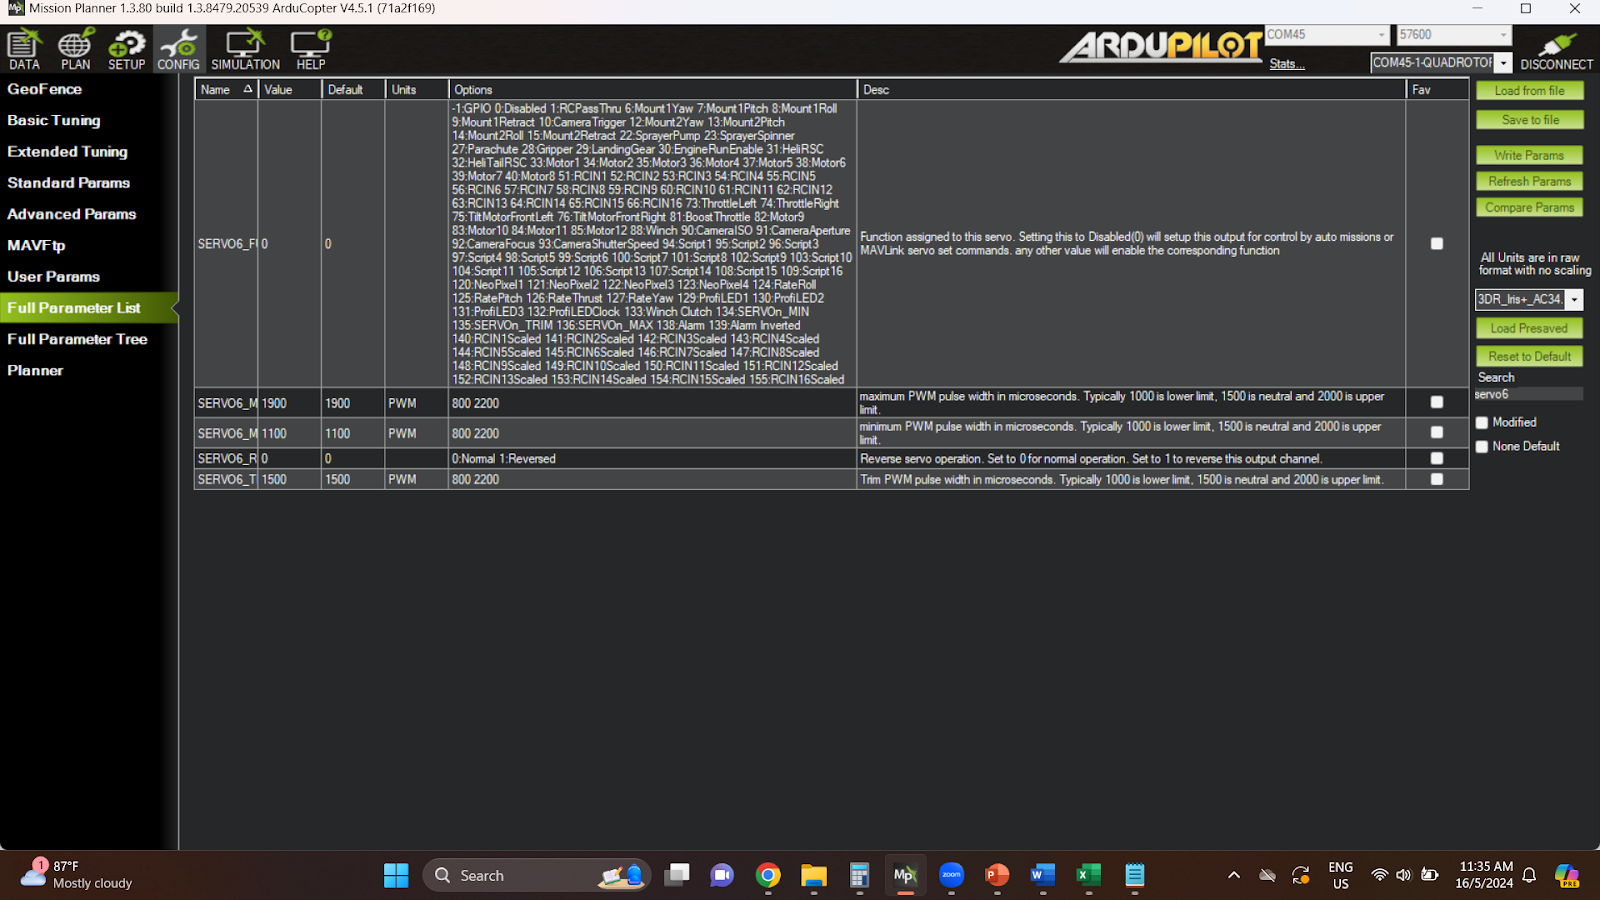
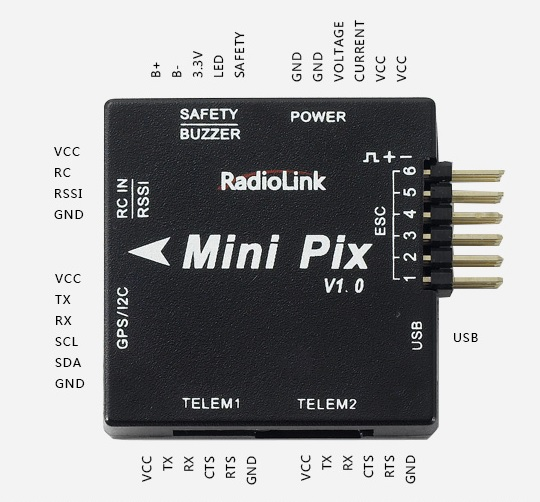
For Mini Pixhawk
1. Connect Servo to ESC 5.
2. Config/ Full parameter list/ set 0. Why 0? This is because :
Setting this to Disabled(0) will setup this output for control by auto missions or MAVLINK Servo set commands.
3. Then check either servo is working, push the servo a bit and check if the servo has power or mechanical resistance.
4. Then, go to front tab, and click Low / Mid/ High at Servo 5.
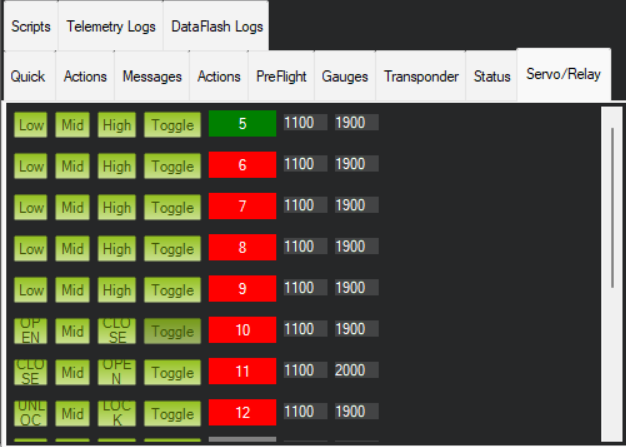
5. The servo should move.
Note: If the servo is not functioning as it should, then check if the servo cable is fully connected to pixhawk mini :Yellow data cable, Red power Cable dan Black Ground Cable.
End
Friday, August 23, 2019
DJI NAZA M WINDOWS 10
Hari ini, teringin nak masukkan naza M kepada drone kecik. Beli naza M pada 5 tahun lepas, time tu pakai windows xp. Tapi sekarang bila nak setup semula, didapati windows 10 reject dji win driver installer bila kita nak install. Sebab windows 10 mempunyai security nya yang tersendiri yang mungkin sudah ditambah baik.
Oleh itu, jadi masalah bila nak install. Setelah 30 minit mencuba, dengan adanya kemudahan maklumat di hujung jari, dapat jumpa video ni di youtube yang mmg boleh pakai (applicable). So, DJI fans, boleh pakai tips di video bawah ni.
Noted.
Download installer di sini (https://www.dji.com/naza-m/download)
Monday, August 19, 2019
ArduRover: Throttle and Steering Separated
Assalamualaikum.
Hari ini saya cuba menggunakan rover separate throttle and steering. Menggunakan buggy hsp. Setelah berhari hari mencuba, hari ini kita cuba pula menggunakan APM. Berjaya dan boleh bergerak secara auto, cuma ada masalah power kerap disconnected menyebabkan apm initializing dan gps lost contact secara tiba tiba dan kerap. Firmware yang digunakan yang ok setakat ini adalah ArduRover 2.5.
Hari ini saya cuba menggunakan rover separate throttle and steering. Menggunakan buggy hsp. Setelah berhari hari mencuba, hari ini kita cuba pula menggunakan APM. Berjaya dan boleh bergerak secara auto, cuma ada masalah power kerap disconnected menyebabkan apm initializing dan gps lost contact secara tiba tiba dan kerap. Firmware yang digunakan yang ok setakat ini adalah ArduRover 2.5.
ArduRover Skid Steering
ArduRover adalah satu rover yang sangat menarik apabila ianya boleh dijalankan secara autonomous iaitu bergerak sendiri melalui points, mahupun menggunakannya secara guided mahupun follow.
Setelah seminggu surfing internet, tiada manual yang lengkap yang boleh digunakan untuk belajar. Jadinya kena surf dan try. Oleh itu di sini saya buat tutorial secara ringkasan untuk memudahkan saya buat semula ardurover ini pada masa akan datang. Sebab lepas ni nak cabut semua dan pasang kepada rover yang lain.
Berikut adalah diagram pemasangan untuk ardurover skid steering. Pada doagram ini, jangan pelik, kerana memerlukan 2 esc untuk mengawal dua motor di kiri dan kanan. Ini kerana saya guna apa yang saya ada. Untuk mendapatkan satu module yang boleh mengawal dua motor adalah sangat mahal pada tika ini di malaysia. daripada beli, baik cuba pakai apa yang ada.


Setelah seminggu surfing internet, tiada manual yang lengkap yang boleh digunakan untuk belajar. Jadinya kena surf dan try. Oleh itu di sini saya buat tutorial secara ringkasan untuk memudahkan saya buat semula ardurover ini pada masa akan datang. Sebab lepas ni nak cabut semua dan pasang kepada rover yang lain.
ArduRover 2.5.1
Berikut adalah diagram pemasangan untuk ardurover skid steering. Pada doagram ini, jangan pelik, kerana memerlukan 2 esc untuk mengawal dua motor di kiri dan kanan. Ini kerana saya guna apa yang saya ada. Untuk mendapatkan satu module yang boleh mengawal dua motor adalah sangat mahal pada tika ini di malaysia. daripada beli, baik cuba pakai apa yang ada.

Firmware
1. Upload Ardurover Firmware. Pilih Firmware Rover yang sesuai untuk APM yang digunakan oleh anda.

2. Oleh kerana kita menggunakan satu motor untuk setiap tayar, oleh itu kita akan gunakan skid steering type. Lihat gambarajah yang diberikan oleh laman web ardupilot di bawah.
In Rover-3.1 (and earlier), skid steering output was enabled by setting the SKID_STEER_OUT parameter to “1”.

Untuk penetapan tersebut, perlu di set di sini. Gunakan search : skid kemudian set kedua duanya kepada nilai 1.

Motor Driver Type: Bipolar
Esc Configuration: Forward and Reverse with Brake.
Done.
And click here for the parameter file that can be load to your mission planner.
 |
| Kedudukan wayar merah hitam untuk motor sebelah kanan |
 |
| Menggunakan remote flysky |
 |
| Wayar Output untuk kedua dua ESC disambungkan kepada 1 dan 3 |
 |
| Dua esc diletakkan bersebelahan |
 |
| Wayar merah hitam untuk motor sebelah kiri |
Friday, July 26, 2019
Setup Auto Mode Supaya Motor boleh hidup..
atau secara mudahnya, set semua value menjadi zero @ 0
TKOFF_THR_DELAY = 0
TKOFF_THR_MINACC = 0
TKOFF_THR_MINSPD = 0
TKOFF_ACCEL_CNT=1 - 10
Tuesday, July 23, 2019
Friday, July 12, 2019
Thursday, July 11, 2019

Wednesday, July 10, 2019
Fsi6 6 modes
6 modes on fs i6. Ini adalah setting yang dah pernah pakai dan ok.
https://discuss.ardupilot.org/t/6-modes-over-2-switches-flysky-fs-i6-tx/9920/8
https://discuss.ardupilot.org/t/6-modes-over-2-switches-flysky-fs-i6-tx/9920/8
Tuesday, July 9, 2019
Arduino bluetooth
Salam.
Cara yang cepat utk setup bluetooth arduino.
https://www.instructables.com/id/Program-an-Arduino-Wireless-Over-Bluetooth/
Cara utk sambung bluetooth kpd 915 telemetry
https://www.dronetrest.com/t/bluetooth-to-telemetry-bridge/205
Cara yang cepat utk setup bluetooth arduino.
https://www.instructables.com/id/Program-an-Arduino-Wireless-Over-Bluetooth/
Cara utk sambung bluetooth kpd 915 telemetry
https://www.dronetrest.com/t/bluetooth-to-telemetry-bridge/205
APM brownout
Salam.
Hari ni setelah setup apm plane, dah sampai masanya utk arm. Bila arm, dan servo aileron, elev, rudder digerakkan, apm tiba tiba restart sendiri.
Setelah mentelaah, disyaki apm brownout. Sebab servo pun tarik current banyak.
Apa yang kami buat esok, supply current apm pakai power module, dan supply current pakai esc. Cabut jumper 1 untuk pisahkan bekalan kuasa antara kedua dua rail.
http://ardupilot.org/plane/docs/common-powering-the-apm2.html#power-module-and-using-servos-with-bec-power-from-one-esc


Wednesday, July 3, 2019
APM Speed Sensor pitot tube setup
Airspeed sensor setup.
Problem.
When first hook up the pitot tube, we got the airspeed is not 0 m/s. It get 50 m/s.
Solution.
By following the instructions in this video, a simple step, we got the correct airspeed as on ground. That is 0.7 - 1.3 m/s.
Credit to the owner of the video.
Thursday, May 2, 2019
Drone Blocks
https://chrome.google.com/webstore/detail/droneblocks/nbfahmffcopanponfpkefngbijhbnffa/related
Link to download droneblock desktop app
Link to download droneblock desktop app
Saturday, March 16, 2019
MinimOSD Setup
Assalamualaikum wbt.
Posting ini berkenaan perkara penting untuk setup MinimOSD RM80++ yang selalunya sukar untuk dibuat dalam 1 malam. Berikut adalah perkaranya.
Bahan bahan
1. MinimOSD
2. FTDI
3. Software - Download file dari sini. Kemudian extract di pc. Seterusnya ikut step seperti diterangkan di sini.
//

Penerangan berkenaan item item di dalam minimosd. (http://dronemission.com/buildadrone-plugNplay-osd.html)
Posting ini berkenaan perkara penting untuk setup MinimOSD RM80++ yang selalunya sukar untuk dibuat dalam 1 malam. Berikut adalah perkaranya.
Bahan bahan
1. MinimOSD
2. FTDI
3. Software - Download file dari sini. Kemudian extract di pc. Seterusnya ikut step seperti diterangkan di sini.
//
Quickstart Guide (c) Johnex
- Download the latest MinimOSD-Extra build here: https://github.com/night-ghost/minimosd-extra/blob/master/osd_latest.zip?raw=true <-- (link yang sama untuk download osd_latest zip.file).
- And then extract the downloaded files and locate OSD_Config.exe (Application).
- Run the OSD_Config.exe
- Connect your MinimOSD to your pc making sure you are using an FTDI that has 5V and not 3.3V.
- After the usb driver is installed, select your COM port in OSD_Config then click Read from OSD

- Click Options -> Update Firmware. Select the Character_Updater_FW.hex file from the "FW_+_Char" folder

- This is a character set uploader, so just click Options -> Update CharSet. Select the latest character set MinimOSD_2.4.1.X.mcm from the "FW_+Char" folder. Notice that this MimimOSD-Extra has a custom character set and must be updated if coming from another fork or the original, and some newer versions might require a new version, always check the "FW+_Char" folder.
- Click Options -> Update Firmware again. Select the latest MinimOsd_Extra_Uni.9XXDV-release.hex file from the "FW_+_Char" folder.
- Set your video mode to Auto if you have different cam types, or select NTSC or PAL if you have just 1 cam and you know it's type or had issues with Auto.
- Connect your OSD directly to a monitor or to a video transmitter so you can see the OSD output, making sure you don't forget to connect the antenna to the video transmitter before powering it on if you are using that. Click Options -> Load TLog. Select 2015-09-06 18-40-55.tlog from the "FW_+_Char" folder.
- Set up the screens as you want. Click "Save Tab to OSD" and then click "Start" to run a simulation so you can see how everything looks without having to set up a copter. If something is not right, click "Stop", do the changes, save the config again and click "Start" again to see the new changes.
- If you encounter that your screen is not centered, change the "Offsets", Left and Top from the config page. You can also move panels away from the edge if your screen gets cropped.


//
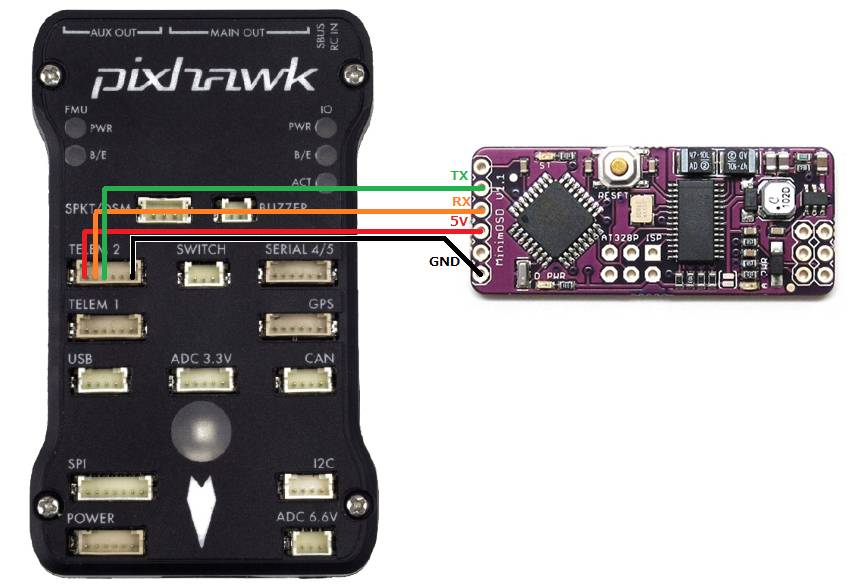
Untuk sambungan wayar, pastikan MinimOSD dibekalkan 12v input.

InsyaALLAH semua akan ok kalau sambungan wayar yang betul. Khususnya input 12v dari battery kepada power input di MinimOSD seperti gambar di atas.
Pada hari ni, selepas beberapa hari study di phone dan tanya kenalan di whatsapp baru boleh keluar rssi value dari pixhawk yang disambungkan kepada rx skydroid.

1. Di Rssi source pilih Channel 8.

Subscribe to:
Comments (Atom)